RES 3700 - How to clear system financial totals from the database.

So for whatever reason you want to clear all of the financial totals from the database. Here is how its done.

Open the Micros Control Panel and bring the system to database level.


Open the Micros Pos Configurator -> Totals -> Clear All Totals or you can clear each set of totals individually.


Depending on how many totals you have in the database this can take a few seconds to about 15 minutes.

After it is successfull you will get a popup advising you of this.You will be unable to use the pos configurator untill this has been completed.

After completion you will need to reboot the micros database.


RES 3700 - How to configure an Autosequence.

.

An autosequence is basically some group of tasks that can be set to run automatically or manually. They are similar to a macro.

Login to the Pos Configurator -> Reporting


Select Autosequences. Scroll down to the bottom and press the blue + button to create a new Autosequence and enter a name.


Here you can set the autosequence to run as part of a schedule. From the drop down list select a schedule or press the yellow folder symbol to create a new schedule.
If you want the Autosequence to appear on the run screen of "Autosequences and Reports" make sure the "Hide on run screen" is not selected.

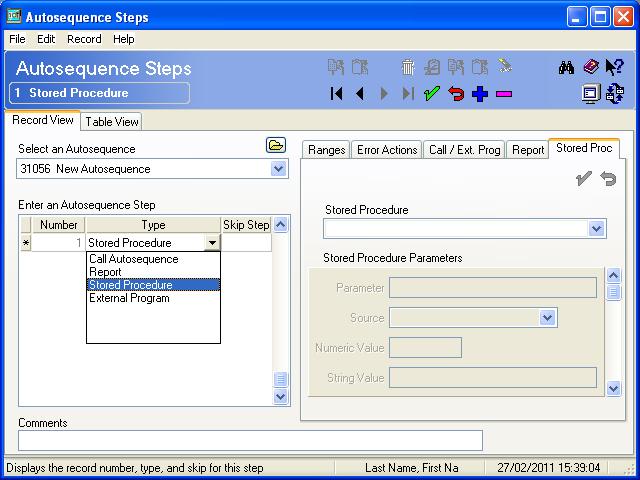
Save and now select "Autosequence Steps" from the Pos Configurator. From the drop down list select the autosequence you created.


Press the blue + to create a new step and double click on the Type field to select what sort of step you want to create.


From here on its fairly self explanatory.

Types:
Call Autosequence - Calls a previously created autosequence.
Report - Allows you to print a report as part of the autosequence (you can also print to a file from here)
Stored Procedure - Allows you to call stored procedures eg Set Business Date.
External Program - Allows you call an external program configured in the Pos Configurator -> System -> External Programs.

RES 3700 - Recover Micros login ID from database

Due to the nature of the restaurant business there is generally a large amount of staff turnover. This can sometimes lead to senior level access to the Micros POS system being lost of just not passed from one person to another.

Thankfully its easy to get back through some SQL commands.

NOTE: If you are uncomfortable with performing any of these tasks contact someone who will be able to follow these instructions or I may be able to perform these tasks remotely for a fee. See my email address at the top of this page if you need to contact me.


Classic Security:

For this we need access to DBISQL. If you don't know what this is read my quick overview of it here.

After logging in run the following statement:
Select first_name, last_name, pc_appl_id, id, effective_to from micros.emp_def

This will return to you all of the employees in the database with their login information. Select the appropriate information for the previous person with full system access.

PC_APPL_ID = Login ID for the micros applications on the server eg Pos Configurator
ID = Login ID for the till system. Usually their employee card number.
EFFECTIVE_TO = If the employee was setup to expire at a particular date then this is the date. If it is before today then you will not be able to login using this ID.

Enhanced Security:

If you have enhanced security which requires a username and password to login to the micros applications follow the below steps.

First you will need to perform the above steps for Classic Security and get a valid PC_APPL_ID.

Next you want to disable the Enhanced Security so that you can login using just the PC_APPL_ID number.

Execute the following update in DBISQL to disable the enhanced security.

update micros.rest_def set ob_classic_security = 'T'
Commit                                                                  

Now open the Pos Configurator and it will allow you to login with just the pc_appl_id number.
As soon as you login execute the following statement to re-enable the enhanced security.

update micros.rest_def set ob_classic_security = 'F'
Commit                                                                  
Now open the employee list and you can now set yourself a new Username and Password.


Hope this helps you out.


Erasing contents of a Micros WS4, WS4LX, WS5(a)

Sometimes you want to wipe the contents of a workstation for whatever reason. These instructions are identical regardless of workstation and POS type. This is how its done:

On all WS4, WS4LX, WS5 and WS5a workstations there are two drives called CF and DOC.

The DOC is a storage space on the workstation which is not on the Compact Flash card.
In the DOC drive you will have a folder called Utilities and inside this folder there is an executable called WCF.exe. This executable is basically used to reset the workstation back to factory settings.

Once launched you will be given three options:
- Clear Registry Settings
- Erase Compact Flash
- Format Compact Flash

All options are self explanatory. One note however Format Compact Flash automatically performs option 1&2. Once any of the options are selected the workstation shuts down. You will need to press the power button to turn it back on. Once it turns back on you will be requested to install micros again using CAL.

RES 3700 - Log files for Micros RES 3700

3700d.log - Located in D:\Micros\Res\Pos\Etc

The 3700d.log contains the general day to day logs of the micros pos system.

The logs are rotated every day as part of the end of day or whenever the executable "rotatelog.exe" is executed.
Each rotation appends a number to the end of the file name eg. 3700d.log.0
A maximum of 7 days logs is kept at any one time.

The verbosity level of the log file defines how much detail is logged. By default it is at level 0.
To change the verbosity open the micros control panel via the run prompt "cpanel.exe /verbosity" and in the control panel you will have a new verbosity tab where you can set the logging level. See the below screenshot.

 
If you select your Server name and select the verbosity tab you will see a list of modules where you can increase the verbosity level using the slider along the bottom for a particular module.

This becomes very useful if you notice a problem with a certain part of micros and to help diagnose this you increase the verbosity.

NOTE: If the verbosity level is left too high the log files can become very large very fast.


DM.log Located in D:\Micros\Common\Etc

This log contains information from the usage of the Database Manager. ie. backups, backup validation etc.


CLCONTROL_SERVERNAME.log Located in D:\Micros\Res\Pos\Etc

This log contains the logs when the CLCONTROL command line database control program us used.

RES 3700 - Remote reboot of workstations in Micros RES 3700 POS command line

As you may have already noticed in RES 4.x they introduced a reboot feature in the Micros Control Panel which lets you reboot an individual workstation or all of the workstations at once.

What you probably didn't know was that this functionality has always been available since the first Micros 3700 Pos system. It is a command line program called REMOTEREBOOT.exe and is located in D:\Micros\Common\Bin

If you type REMOTEREBOOT /? into the command prompt you get the below user information but simply if you type "remotereboot WS01"  it reboots the workstation called WS01. Simple and useful.

MICROS RES RemoteReboot version 4.1
usage:  RemoteReboot [/?] [-h] [/allclients] [<nodenames>]+

   /? or -h prints this help message.

   /allclients reboots all configured clients. Will not reboot the server.

   Specifying one or more computer nodenames on the command line will cause
      a message to be sent to reboot only those client workstations

RES 3700 - Command line database control for Micros RES 3700 POS.

A little known fact is that Micros RES 3700 POS comes with a nifty little command line tool which lets you replicate the functionality of the Micros Control Panel.

The tool is called CLCONTROL and is located in D:\Micros\Res\Pos\Bin

open the command prompt and type CLCONTROL /? and it will display the below help on how to use it.
It is fairly straight forward and if you don't understand it then you should'nt be using it.

There is also a log file for the tool kept in D:\Micros\Res\Pos\Etc called CLCONTROL_SERVERNAME.log

0000000 02/26/2011 16:15:43 Sat Feb 26 16:15:43 2011
Usage:
-----
  CLControl /SYSTEM FOH    ( Front Of House )
  CLControl /SYSTEM BOH    ( Back  Of House )
  CLControl /SYSTEM DB     ( Database )
  CLControl /SYSTEM IDLE   ( System Shutdown )
  CLControl /SYSTEM STATUS ( System Status )
          Possible System Status Return Code
          -----------------------------------
          0    ( FAULT )
          1    ( IDLE  )
          2    ( DB    )
          3    ( BOH   )
          4    ( FOH   )
          5    ( BUSY  )

  CLControl /NODE <NNN> /PROCESS <PPP> ON     ( Start  process <PPP> on node <NN
N> )
  CLControl /NODE <NNN> /PROCESS <PPP> OFF    ( Stop   process <PPP> on node <NN
N> )
  CLControl /NODE <NNN> /PROCESS <PPP> RELOAD ( Reload process <PPP> on node <NN
N> )
  CLControl /NODE <NNN> /PROCESS <PPP> STATUS ( STATUS of process <PPP> on node
<NNN> )
          Possible Process Status Return Code
          -----------------------------------
          0    ( FAULT     )
          1    ( OFF       )
          2    ( ON        )
          3    ( RELOADING )
          4    ( BUSY      )

  CLControl /M <text>                        ( Insert <text> in 3700d log file )

  CLControl /CLEAR                           ( Clear the 3700d log file )
  CLControl /LIST <path> NODES               ( List nodes in file <path> )
  CLControl /LIST <path> /NODE <NNN> PROCESS ( List node <NNN> processes in <pat
h> )

  Note that the /SYSTEM commands can have SYNC appended to indicate
       that the request should be issued to all nodes at once.

RES 3700 - Understanding DBISQL for Micros POS.

DBISQL is a program which is used to query the Micros 3700 POS database.
It can be launched on the micros server by typing DBISQL into the run prompt and pressing OK. See below screenshots.


Micros POS installs usually have then following passwords by default. You may also have been given a DBA password by your micros installer.

Username: custom
Password: custom

or

Username: installer
Password: installer

You may also need to select the ODBC data source name which will be called "Micros" but 99% of the time you wont need to do this. See the image above.

----------------------------------------------

An example of what you expect to be able to see after logging in is shown in the image below.


An example what what an actual query in dbisql looks like is shown in the image below. This query returns the data for all checks in the database.


To search how select, update, inserts and everything to do with SQL works I suggest you google some tutorials so you can get the most out of your micros database.
-->

Disclaimer

All information on this web site is correct to the best of my knowledge at the time of writing.
I will not be held responsible for any damage caused through information on this website.