.
Have you lost, forgotten or never had your managers access password ID? Don't worry it can be recovered.
Unfortunately its very difficult compared to Micros 3700 and 9700 and unless you know how to decode binary files using a hex editor im not going to get into it.
If you wish to recover your access I will perform this for a nominal fee of €30 (around 42USD).
For this price you will receive full administrative access to your micros POS system.
If for whatever reason there is no administrative user account in your system ie someone deleted it and then downgraded their own access rights. (Ive seen it done!) I can create an administrative user for you. This will be charged at €100 (around 140USD) because its significantly more work.
I do not need access to your system to perform these tasks but i will need a single file from your database which has the encoded password ID's. Please contact me via email for further information regarding this service. micros.pos.info@gmail.com.
RES 3700 - Cannot delete menu items from Pos Configurator
When you try and delete some menu items from the Pos Configurator menu item list you get the following error:
Key violation.
[Sybase][ODBC Driver][Adaptive Server Anywhere]Integrity constraint violation: Primary key for row in table 'mi_def' is referenced by foreign key 'CFK2MI_DTL'
General SQL error.
in table mi_dtl.
First thing is not to be worried. This is normal behavior.
The reason you are getting this error is because micros keeps records of sales compared to menu items. So basically you cannot delete menu items which have been sold until those historical totals are purged.
See the Pos Configurator -> Reporting -> Historical Totals. This will show you how long each report hold data before they are purged.
If you don't want to use this menu item anymore you have a few options.
1) Reuse the menu item. Just rename it and edit all the options for a new item.
2) Clear all options including the name so its a blank menu item.
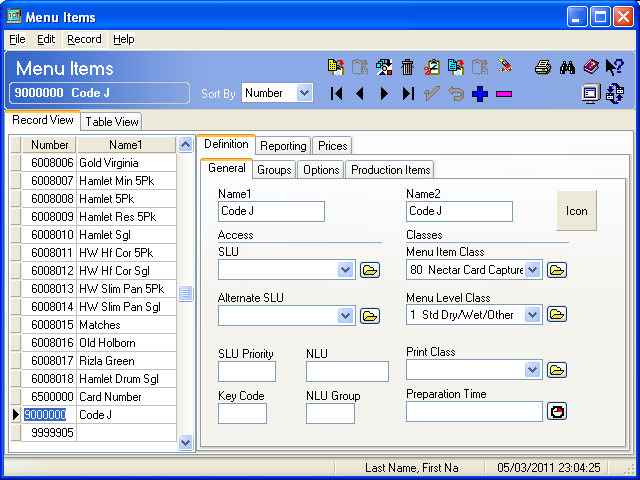
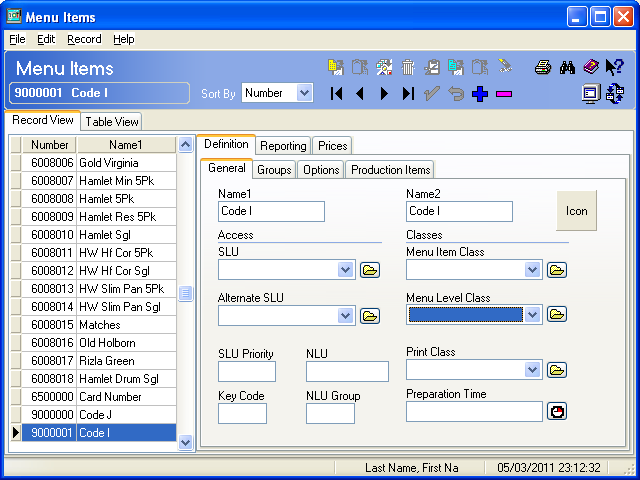
3) Renumber the menu item so that it remains in your system but is just out of the way. See the below pictures as an example. Most people don't have millions of menu items in their database so usually the 9000000 number range is blank.
When you double click on the number beside the menu item you can change the number. Change it to something in the 9000000 range or whatever you want and put it in that part of the list.


Key violation.
[Sybase][ODBC Driver][Adaptive Server Anywhere]Integrity constraint violation: Primary key for row in table 'mi_def' is referenced by foreign key 'CFK2MI_DTL'
General SQL error.
in table mi_dtl.
First thing is not to be worried. This is normal behavior.
The reason you are getting this error is because micros keeps records of sales compared to menu items. So basically you cannot delete menu items which have been sold until those historical totals are purged.
See the Pos Configurator -> Reporting -> Historical Totals. This will show you how long each report hold data before they are purged.
If you don't want to use this menu item anymore you have a few options.
1) Reuse the menu item. Just rename it and edit all the options for a new item.
2) Clear all options including the name so its a blank menu item.
3) Renumber the menu item so that it remains in your system but is just out of the way. See the below pictures as an example. Most people don't have millions of menu items in their database so usually the 9000000 number range is blank.
When you double click on the number beside the menu item you can change the number. Change it to something in the 9000000 range or whatever you want and put it in that part of the list.

...
E7 - Managing and configuring your employees privileges.
E7's employee privilege management is messy but here is how its done.
First you need to enter the Configuration and select Jobs (1).

2 This is the where you can add a new job or a new job category. Select the down arrow and choose the appropriate option.
3 A job category is nothing more than a label. It has no effect on anything.
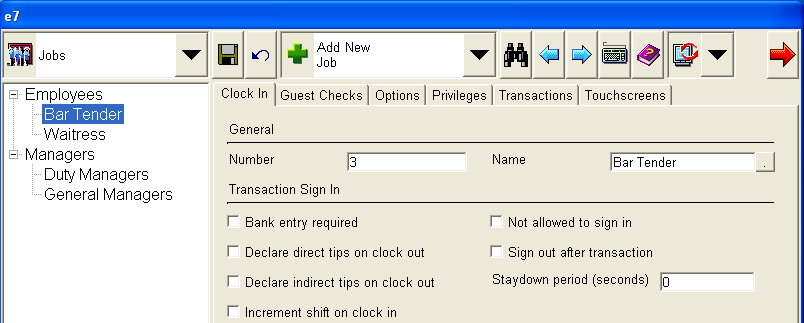
4 A job is very important. It defines all of the jobs privileges and access rights. See below image.

To make things easily managed i suggest you create a "Job Category" for your different types of staff. Eg Managers, Employees, Temporary staff etc.
Within the "Job Category" you should have the breakdown of each employee class where you plan on making their configuration slightly different. EG. Duty Manager has the rights to perform voids but a Bartender does not.
Each of the "Jobs" ie Bartender has 6 tabs containing different options and access rights. Configure them so they are appropriate for the Job type.
Once completed from the Drop down list at 1 select "Employees".

2 You can add a new "Employee Category" or "Employee".
3 "Employee Category" is nothing more than a label. I suggest you create the same categories as you created for "Jobs". It just makes for easier management of your staff.
4 "Employee" is important. Its a unique identification for each employee you have. You can define their name, address, login id's etc.
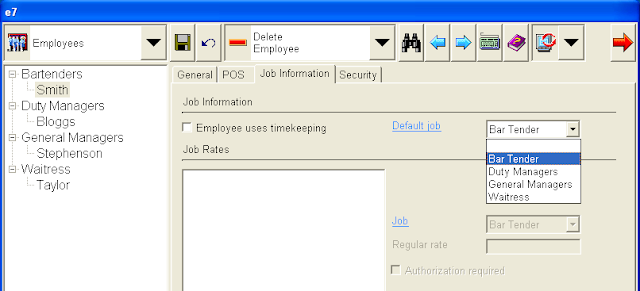
When you create a new employee on the "Job Information" tab you need to select the "Default Job" which you previously created. This links the privileges created to that particular employee. See below Image.
And your done.
.
First you need to enter the Configuration and select Jobs (1).

2 This is the where you can add a new job or a new job category. Select the down arrow and choose the appropriate option.
3 A job category is nothing more than a label. It has no effect on anything.
4 A job is very important. It defines all of the jobs privileges and access rights. See below image.
To make things easily managed i suggest you create a "Job Category" for your different types of staff. Eg Managers, Employees, Temporary staff etc.
Within the "Job Category" you should have the breakdown of each employee class where you plan on making their configuration slightly different. EG. Duty Manager has the rights to perform voids but a Bartender does not.
Each of the "Jobs" ie Bartender has 6 tabs containing different options and access rights. Configure them so they are appropriate for the Job type.
Once completed from the Drop down list at 1 select "Employees".

2 You can add a new "Employee Category" or "Employee".
3 "Employee Category" is nothing more than a label. I suggest you create the same categories as you created for "Jobs". It just makes for easier management of your staff.
4 "Employee" is important. Its a unique identification for each employee you have. You can define their name, address, login id's etc.
When you create a new employee on the "Job Information" tab you need to select the "Default Job" which you previously created. This links the privileges created to that particular employee. See below Image.

And your done.
.
RES 3700 - Incorrect server name in MDSHOSTS.XML
.
If you are seeing this error message in your 3700d.log then either someone has changed the name of your servers hostname or someone changed the name of the server in the pos configurator.
Micros RES relies on the server name remaining unchanged.
Step 1) Find out what your server name should be.
To do this open Services.msc. You will have a service called "sqlSERVERNAME" where servername is the name that your server should be.
Step 2) Next check what your servers name actually is. Open a command prompt and type in "hostname". This will return to you your servers name.
If the servers name is incorrect then change the name back to what you found in step 1. Right click on My Computer -> Properties -> Computer Name tab and click change.
---------------------------------------------
Do you need to change your server name?
There are some reasons why you need to change your servers name whether it be changing your companys name and your server name reflects the old one, moving your server onto a domain etc.
Micros supplies a handy little tool which does all the work for you. This tool is compatible with RES 4.9 and below. Click here to download it.
Email me if the download link stops working.
Usage:
Within the ZIP file you have the following files:
- setname.exe
- setname.cfg
- mfc70.dll
- msvci70.dll
- msvcr70.dll
Copy all 5 files to D:\Micros\Res\Pos\Etc
Note: This tool changes your computer name as well as any necessary registry settings.
Before starting turn your database off from the Micros Control panel.
Run setname.exe and you will be shown the same as the below image.
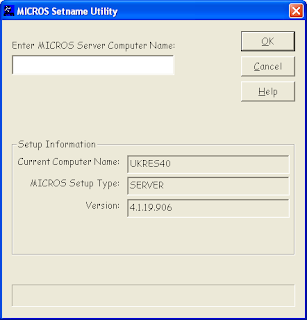
Enter your new server name in the text box provided and press OK. You will be informed when the program has completed. It shouldn't take too long.
Restart the server.
Once the server is restarted open the Pos Configurator -> Devices -> Network nodes.
Select your server from the list and change the computer name to your new name.
Press the green tick to save.
Reload the database from the Micros Control Panel.
And your done!.
.
.
If you are seeing this error message in your 3700d.log then either someone has changed the name of your servers hostname or someone changed the name of the server in the pos configurator.
Micros RES relies on the server name remaining unchanged.
Step 1) Find out what your server name should be.
To do this open Services.msc. You will have a service called "sqlSERVERNAME" where servername is the name that your server should be.
Step 2) Next check what your servers name actually is. Open a command prompt and type in "hostname". This will return to you your servers name.
If the servers name is incorrect then change the name back to what you found in step 1. Right click on My Computer -> Properties -> Computer Name tab and click change.
---------------------------------------------
Do you need to change your server name?
There are some reasons why you need to change your servers name whether it be changing your companys name and your server name reflects the old one, moving your server onto a domain etc.
Micros supplies a handy little tool which does all the work for you. This tool is compatible with RES 4.9 and below. Click here to download it.
Email me if the download link stops working.
Usage:
Within the ZIP file you have the following files:
- setname.exe
- setname.cfg
- mfc70.dll
- msvci70.dll
- msvcr70.dll
Copy all 5 files to D:\Micros\Res\Pos\Etc
Note: This tool changes your computer name as well as any necessary registry settings.
Before starting turn your database off from the Micros Control panel.
Run setname.exe and you will be shown the same as the below image.
Enter your new server name in the text box provided and press OK. You will be informed when the program has completed. It shouldn't take too long.
Restart the server.
Once the server is restarted open the Pos Configurator -> Devices -> Network nodes.
Select your server from the list and change the computer name to your new name.
Press the green tick to save.
Reload the database from the Micros Control Panel.
And your done!.
.
.
LES 9700 - Installing Winstation or SAR OPS on Desktop PC Win32 environment.
.
This guide is for people who want to install Micros LES 9700 Winstation or SAR OPS on a Windows based PC.
These are instructions on how to install the workstation but not how to configure the workstation in the EMC. I might create instructions on this at a later stage.
NOTE: From this point on i will refer to the computer you want to install micros on as a workstation.
Step 1) On your workstation map a network drive to your micros server. To do this press Start -> Run and type "\\SERVERNAME" where SERVERNAME is the IP address or Hostname of the micros server.
You may be prompted to enter a username and password.
Either way you will be brought to a share drive where you should have a folder called "MicrosClient" or "ClientInstalls".
If you wish to install a Winstation client proceed to step 2. If you wish to install a SAR client proceed to step 3.
Step 2) Double click on the Winstation.exe. The installation will begin. Keep pressing Next until you come to a screen to choose Administrator or Workstation mode. Choose Administrator mode. As the name suggests you must be loggin in as an administrator.
Keep pressing next and finally Finish and then the installation will begin.
Once finished you will need to reboot the workstation.
After reboot you will have a Winstation.exe on you desktop where you will be able to launch the client from.
Step 3) Open the SarClient folder and double click on the setup.exe. When the installer asks you to enter your Primary server name enter the IP address of the micros server. Enter the workstation name and complete the install.
After reboot you will have a SAROPS.exe on the desktop of your workstation.
RES/LES/SIM/E7 - How to configure a WindowsCE based workstation using CAL. WS4/WS4lx/WS5/WS5a
All Micros POS workstations come preloaded with the Micros CAL software.
The CAL instructions are the same regardless of what version of POS you are running whether it be RES 3700, LES 9700, Simphony or E7.
Step 1) This is not a necessary step but i recommend it anyway. We want to wipe any traces of previous installations off the workstation. Skip this step if you have information and files on the workstation you want to retain.
On all WS4, WS4LX, WS5 and WS5a workstations there are two drives called CF and DOC. To access these open the "My Device" or "My Computer" folder which is on the Desktop of your workstation.
The DOC is a storage space on the workstation which is not on the Compact Flash card.
In the DOC drive you will have a folder called Utilities and inside this folder there is an executable called WCF.exe. This executable is basically used to reset the workstation back to factory settings.
Once launched you will be given three options:
- Clear Registry Settings
- Erase Compact Flash
- Format Compact Flash
All options are self explanatory. One note however Format Compact Flash automatically performs option 1&2 as well as formatting the flash.
I recommend selecting option 1&2. Once any of the options are selected you will be asked to confirm and then the workstation shuts down. You will need to press the power button to turn it back on.
When the workstation turns back on it will automatically start searching for your micros server.
Step 2) If you have performed step 1 skip this step.
Press the Windows Start button -> Programs -> CAL -> Reconfigure CAL.
When you select this you will see a program popup which a blue progression bar. This program is searching for your micros server. See below image.
 Step 3) Once the search is complete you will be displayed a list of your available Micros Servers.
See below image.
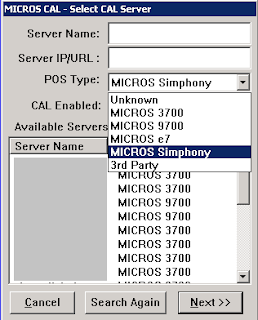
You will likely be returned only one server but im using a test system which has lots of servers as you can see.
In the "Available Servers" section you will have two columns. Server Name and Pos Type. I have greyed out my server names. From this list select your server and you will see the Server Name, Server IP and Pos Type fields will be automatically populated.
You also have an option called "CAL Enabled". Make sure this box is ticked.
If no server is found make sure your network cable is securely plugged in and that the micros server is running.
Step 4) Select Next. You will be displayed a list of available workstations. See below Image.
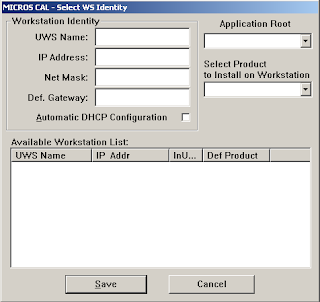
I have cleared the fields in the above image.
In the "Available Workstation List" you should have all of your workstations listed.
Select the workstation you wish to configure. When you select the workstation name all of the information fields will automatically populate. Once done select SAVE and the installation will begin.
The workstation will likely reboot multiple times during the install but will eventually complete.
NOTE: If you reach this step and the workstation list is blank you have two options:
1) Go to your micros server and find the workstation detail and enter them manually. Will will likely have to connect a USB keyboard to do this.
2) Save anyway and it will install the software without linking it to any particular workstation. Go to the micros server and restart the "Micros CAL Service" from services.msc and repeat steps 2 and 3.
3) You did not select "CAL Enabled" resulting in no workstations displayed in which case see option 2.
And your done.
If you wish to learn how to install LES 9700 Winstation or SAR Client on a Desktop PC click here.
If you wish to learn how to install RES on a Desktop PC click here.
The CAL instructions are the same regardless of what version of POS you are running whether it be RES 3700, LES 9700, Simphony or E7.
Step 1) This is not a necessary step but i recommend it anyway. We want to wipe any traces of previous installations off the workstation. Skip this step if you have information and files on the workstation you want to retain.
On all WS4, WS4LX, WS5 and WS5a workstations there are two drives called CF and DOC. To access these open the "My Device" or "My Computer" folder which is on the Desktop of your workstation.
The DOC is a storage space on the workstation which is not on the Compact Flash card.
In the DOC drive you will have a folder called Utilities and inside this folder there is an executable called WCF.exe. This executable is basically used to reset the workstation back to factory settings.
Once launched you will be given three options:
- Clear Registry Settings
- Erase Compact Flash
- Format Compact Flash
All options are self explanatory. One note however Format Compact Flash automatically performs option 1&2 as well as formatting the flash.
I recommend selecting option 1&2. Once any of the options are selected you will be asked to confirm and then the workstation shuts down. You will need to press the power button to turn it back on.
When the workstation turns back on it will automatically start searching for your micros server.
Step 2) If you have performed step 1 skip this step.
Press the Windows Start button -> Programs -> CAL -> Reconfigure CAL.
When you select this you will see a program popup which a blue progression bar. This program is searching for your micros server. See below image.
See below image.

You will likely be returned only one server but im using a test system which has lots of servers as you can see.
In the "Available Servers" section you will have two columns. Server Name and Pos Type. I have greyed out my server names. From this list select your server and you will see the Server Name, Server IP and Pos Type fields will be automatically populated.
You also have an option called "CAL Enabled". Make sure this box is ticked.
If no server is found make sure your network cable is securely plugged in and that the micros server is running.
Step 4) Select Next. You will be displayed a list of available workstations. See below Image.

I have cleared the fields in the above image.
In the "Available Workstation List" you should have all of your workstations listed.
Select the workstation you wish to configure. When you select the workstation name all of the information fields will automatically populate. Once done select SAVE and the installation will begin.
The workstation will likely reboot multiple times during the install but will eventually complete.
NOTE: If you reach this step and the workstation list is blank you have two options:
1) Go to your micros server and find the workstation detail and enter them manually. Will will likely have to connect a USB keyboard to do this.
2) Save anyway and it will install the software without linking it to any particular workstation. Go to the micros server and restart the "Micros CAL Service" from services.msc and repeat steps 2 and 3.
3) You did not select "CAL Enabled" resulting in no workstations displayed in which case see option 2.
And your done.
If you wish to learn how to install LES 9700 Winstation or SAR Client on a Desktop PC click here.
If you wish to learn how to install RES on a Desktop PC click here.
Subscribe to:
Posts (Atom)